Ubuntu 22.04 Server / ZIP 압축 파일 푸는 방법
ZIP 파일을 압축 해제하기 위해서는 unzip 패키지가 필요하다.
# apt install unzip
xxx.zip 파일을 압축 해제하려면 다음과 같이 명령한다.
# unzip xxx.zip
다음과 같이 명령하여 도움말을 볼 수 있다.
# unzip -h
결과는 다음과 같다.
UnZip 6.00 of 20 April 2009, by Debian. Original by Info-ZIP.

Usage: unzip [-Z] [-opts[modifiers]] file[.zip] [list] [-x xlist] [-d exdir]
  Default action is to extract files in list, except those in xlist, to exdir;
  file[.zip] may be a wildcard.  -Z => ZipInfo mode ("unzip -Z" for usage).

  -p  extract files to pipe, no messages     -l  list files (short format)
  -f  freshen existing files, create none    -t  test compressed archive data
  -u  update files, create if necessary      -z  display archive comment only
  -v  list verbosely/show version info       -T  timestamp archive to latest
  -x  exclude files that follow (in xlist)   -d  extract files into exdir
modifiers:
  -n  never overwrite existing files         -q  quiet mode (-qq => quieter)
  -o  overwrite files WITHOUT prompting      -a  auto-convert any text files
  -j  junk paths (do not make directories)   -aa treat ALL files as text
  -U  use escapes for all non-ASCII Unicode  -UU ignore any Unicode fields
  -C  match filenames case-insensitively     -L  make (some) names lowercase
  -X  restore UID/GID info                   -V  retain VMS version numbers
  -K  keep setuid/setgid/tacky permissions   -M  pipe through "more" pager
  -O CHARSET  specify a character encoding for DOS, Windows and OS/2 archives
  -I CHARSET  specify a character encoding for UNIX and other archives

See "unzip -hh" or unzip.txt for more help.  Examples:
  unzip data1 -x joe   => extract all files except joe from zipfile data1.zip
  unzip -p foo | more  => send contents of foo.zip via pipe into program more
  unzip -fo foo ReadMe => quietly replace existing ReadMe if archive file newer
우분투 14.04에 LESS를 설치하는 방법을 메모합니다. Node.js 설치 apt-get install nodejs NPM 설치 apt-get install npm LESS 설치 npm install -g less less-plugin-clean-css /usr/local/bin/lessc 파일 첫 줄에 다음과 같은 코드가 있습니다. #!/usr/bin/env node 다음처럼 바꿉니다. #!/usr/bin/env nodejs
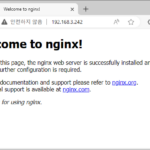
Ubuntu 22.04 Server / NGINX / 설치와 설정
Nginx는 높은 성능과 안정성을 제공하는 웹 서버 소프트웨어로, 웹 서버 외에도 리버스 프록시, 로드 밸런서, 메일 프록시 등의 기능을 수행할 수 있다. Igor Sysoev가 2004년에 처음 개발했으며, 현재는 오픈 소스 소프트웨어로 널리 사용되고 있다. 가정 Ubuntu 22.04 Server의 IP는 192.168.3.242이고, 내 컴퓨터에서 IP로 접근 가능하다. 내 컴퓨터의 OS는 Windows이다. 설치 nginx 패키지 설치 다음과 같이 명령하여 ...
Ubuntu 24.04 Server / root 계정으로 로그인할 수 있게, ssh 접속할 수 있게 설정하는 방법
Ubuntu는 설치할 때 일반 사용자 계정만 만들고, 관리자 권한이 필요할 때는 sudo를 이용한다. 만약 보안에 문제가 없는 경우라면 root 계정으로 로그인하는 게 작업하는 게 편하다. root 계정으로 로그인할 수 있게 설정하는 방법 일반 사용자 계정으로 로그인한다. 다음과 같이 명령하여 root 계정의 비밀번호를 만들면 root 계정으로 로그인할 수 있다. # sudo passwd root root 계정으로 ssh ...
PHP intl 설치 apt install php-intl service apache2 reoad APCu 설치 apt install php-apcu service apache2 reload
MariaDB / 포트 변경 MariaDB의 기본 접속 포트는 3306입니다. 이를 다른 포트로 변경하고 싶다면 /etc/mysql/mariadb.conf.d/50-server.cnf를 수정합니다. port = 3306 을 찾아서 원하는 포트로 변경한 후 저장합니다. 그리고 MariaDB를 재시작합니다. service mysql restart MariaDB / Can't connect to MySQL server on ... (10061) 다음과 같은 에러를 만났다면... Can't connect to MySQL server on ... (10061) /etc/mysql/mariadb.conf.d/50-server.cnf에 있는 bind-address = 127.0.0.1 를 ...
Ubuntu 16.04 / phpMyAdmin / 특정 IP에서만 접속 가능하게 만드는 방법
우분투 16.04에서 phpMyAdmin을 패키지로 설치했을 때, 기본 설정은 모든 IP에서 접속 가능입니다. 만약 특정 IP에서만 접속 가능하게 하려면 /etc/apache2/conf-available/phpmyadmin.conf에 다음 코드를 추가합니다. <Directory /usr/share/phpmyadmin> Order deny,allow Deny from all Allow from xxx.xxx.xxx.xxx </Directory> xxx.xxx.xxx.xxx는 접속하려는 IP로 바꿉니다. 여러 IP를 설정하고 싶을 때는 띄어쓰기로 구분합니다. <Directory /usr/share/phpmyadmin> Order deny,allow Deny from all ...
Ubuntu 16.04 / Apache / javascript 폴더 접근이 안되는 문제 해결하는 방법
javascript 폴더 접근 불가 우분투(Ubuntu)에서 아파치(Apache)로 웹서버를 운영할 때 이상한 문제가 하나 발생합니다. 사이트 경로에 javascript가 있으면 forbidden 에러가 나는 것입니다. Forbidden You don't have permission to access /javascript/ on this server. 이 문제가 발생하는 이유는 자바스크립트 설정 때문입니다. /etc/apache2/conf-available/javascript-common.conf에 다음과 같은 코드가 있습니다. Alias /javascript /usr/share/javascript/ javascript로 접속하면 /usr/share/javascript/로 연결시키라는 뜻입니다. 사이트 접속자는 /usr/share/javascript/에 접속 권한이 없으므로 forbidden 에러가 ...
Ubuntu 18.04 Server / apt / 패키지 설치, 삭제, 업그레이드하는 명령어
Ubuntu에서 패키지를 관리하는 명령어는 여러 가지가 있습니다. 그 중 널리 사용되는 것은 apt-get과 apt입니다. 아래는 apt를 이용하여 패키지를 설치하고 삭제하고 업그레이드하는 방법입니다. 대부분의 경우 apt-get을 사용해도 작동합니다. APT 사용법 패키지 목록을 갱신합니다 # apt update 모든 패키지를 최신 버전으로 업그레이드합니다. # apt upgrade abc 패키지를 설치합니다. 의존성있는 패키지도 함께 설치합니다. # apt install abc abc 패키지를 삭제합니다. 설정 ...
Ubuntu 16.04 Server / 고정 IP 설정하는 방법
네트워크 설정 파일은 /etc/network/interfaces이다. 우분투를 DHCP로 설치했다면 설정 파일의 내용은 다음과 비슷하게 되어 있다. # The primary network interface auto enp0s3 iface enp0s3 inet dhcp 이를 다음처럼 변경하고 저장한다. xxx.xxx.xxx.xxx는 네트워크 환경에 맞게 수정한다. # The primary network interface auto enp0s3 iface enp0s3 inet static address xxx.xxx.xxx.xxx netmask xxx.xxx.xxx.xxx gateway xxx.xxx.xxx.xxx dns-nameservers xxx.xxx.xxx.xxx 다음과 같이 명령하여 네트워크를 재시작한다. systemctl restart networking.service 만약 위와 같이 해도 ...
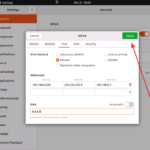
Ubuntu 22.04 Server / 고정 IP 설정하는 방법
설정 파일 수정하기 네트워크 설정 파일은 /etc/netplan 디렉토리 안에 있는 yaml 파일이다. DHCP로 설치했다면, 설정 파일 내용은 다음과 비슷하게 되어 있다. # This is the network config written by 'subiquity' network: ethernets: eth0: dhcp4: true version: 2 다음과 같이 수정하고 저장한다. IP 등은 네트워크 환경에 ...