리눅스 / 명령어 / which, whereis, locate / 명령어 위치 찾기
명령어의 위치를 찾을 때 사용할 수 있는 명령어에는 which, whereis, locate가 있다. 명령어의 위치만 찾을 때는 which를 사용하고, 관련된 파일들의 위치까지 찾을 때는 whereis나 locate를 사용한다.
- which 명령어로 find 명령어를 찾는다.
# which find
/usr/bin/find
- whereis 명령어로 find 명령어를 찾는다.
# whereis find
find: /usr/bin/find /usr/share/man/man1/find.1.gz
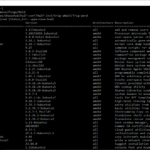
- locate 명령어로 find 명령어를 찾는다.
# locate find
/usr/bin/find
/usr/bin/find2perl
/usr/bin/findmnt
/usr/bin/nl-link-ifindex2name
/usr/bin/nl-link-name2ifindex
/usr/bin/oldfind
/usr/lib64/python2.7/modulefinder.py
/usr/lib64/python2.7/modulefinder.pyc
/usr/lib64/python2.7/modulefinder.pyo
/usr/sbin/btrfs-find-root
/usr/sbin/findfs
/usr/share/bash-completion/completions/findmnt
/usr/share/doc/findutils-4.5.11
/usr/share/doc/findutils-4.5.11/AUTHORS
/usr/share/doc/findutils-4.5.11/COPYING
/usr/share/doc/findutils-4.5.11/ChangeLog
/usr/share/doc/findutils-4.5.11/NEWS
/usr/share/doc/findutils-4.5.11/README
/usr/share/doc/findutils-4.5.11/THANKS
/usr/share/doc/findutils-4.5.11/TODO
/usr/share/doc/wpa_supplicant-2.6/examples/p2p/p2p_find.py
/usr/share/doc/wpa_supplicant-2.6/examples/p2p/p2p_stop_find.py
/usr/share/info/find-maint.info.gz
/usr/share/info/find.info.gz
/usr/share/locale/be/LC_MESSAGES/findutils.mo
/usr/share/locale/bg/LC_MESSAGES/findutils.mo
/usr/share/locale/ca/LC_MESSAGES/findutils.mo
/usr/share/locale/cs/LC_MESSAGES/findutils.mo
/usr/share/locale/da/LC_MESSAGES/findutils.mo
/usr/share/locale/de/LC_MESSAGES/findutils.mo
/usr/share/locale/el/LC_MESSAGES/findutils.mo
/usr/share/locale/eo/LC_MESSAGES/findutils.mo
/usr/share/locale/es/LC_MESSAGES/findutils.mo
/usr/share/locale/et/LC_MESSAGES/findutils.mo
/usr/share/locale/fi/LC_MESSAGES/findutils.mo
/usr/share/locale/fr/LC_MESSAGES/findutils.mo
/usr/share/locale/ga/LC_MESSAGES/findutils.mo
/usr/share/locale/gl/LC_MESSAGES/findutils.mo
/usr/share/locale/hr/LC_MESSAGES/findutils.mo
/usr/share/locale/hu/LC_MESSAGES/findutils.mo
/usr/share/locale/id/LC_MESSAGES/findutils.mo
/usr/share/locale/it/LC_MESSAGES/findutils.mo
/usr/share/locale/ja/LC_MESSAGES/findutils.mo
/usr/share/locale/ko/LC_MESSAGES/findutils.mo
/usr/share/locale/lg/LC_MESSAGES/findutils.mo
/usr/share/locale/lt/LC_MESSAGES/findutils.mo
/usr/share/locale/ms/LC_MESSAGES/findutils.mo
/usr/share/locale/nl/LC_MESSAGES/findutils.mo
/usr/share/locale/pl/LC_MESSAGES/findutils.mo
/usr/share/locale/pt/LC_MESSAGES/findutils.mo
/usr/share/locale/pt_BR/LC_MESSAGES/findutils.mo
/usr/share/locale/ro/LC_MESSAGES/findutils.mo
/usr/share/locale/ru/LC_MESSAGES/findutils.mo
/usr/share/locale/rw/LC_MESSAGES/findutils.mo
/usr/share/locale/sk/LC_MESSAGES/findutils.mo
/usr/share/locale/sl/LC_MESSAGES/findutils.mo
/usr/share/locale/sr/LC_MESSAGES/findutils.mo
/usr/share/locale/sv/LC_MESSAGES/findutils.mo
/usr/share/locale/tr/LC_MESSAGES/findutils.mo
/usr/share/locale/uk/LC_MESSAGES/findutils.mo
/usr/share/locale/vi/LC_MESSAGES/findutils.mo
/usr/share/locale/zh_CN/LC_MESSAGES/findutils.mo
/usr/share/locale/zh_TW/LC_MESSAGES/findutils.mo
/usr/share/man/man1/find.1.gz
/usr/share/man/man1/find2perl.1.gz
/usr/share/man/man1/oldfind.1.gz
/usr/share/man/man8/btrfs-find-root.8.gz
/usr/share/man/man8/findfs.8.gz
/usr/share/man/man8/findmnt.8.gz
- locate 명령어는 -n 옵션으로 출력 개수를 정할 수 있다.
[root@localhost ~]# locate find -n 10
/usr/bin/find
/usr/bin/find2perl
/usr/bin/findmnt
/usr/bin/nl-link-ifindex2name
/usr/bin/nl-link-name2ifindex
/usr/bin/oldfind
/usr/lib64/python2.7/modulefinder.py
/usr/lib64/python2.7/modulefinder.pyc
/usr/lib64/python2.7/modulefinder.pyo
/usr/sbin/btrfs-find-root
locate 명령어의 경우 설치가 필요할 수도 있다. CentOS라면 다음과 같이 명령하여 설치한다.
yum install mlocate
사용 전에 DB를 업데이트해야 한다.
updatedb
DB에서 검색하므로 검색 결과가 빠르게 나온다.

CentOS 7 / mod_security 설치하는 방법
mod_security는 아파치 웹서버에 사용할 수 있는 방화벽 모듈입니다. ModSecurity is an open source, cross-platform web application firewall (WAF) module. Known as the "Swiss Army Knife" of WAFs, it enables web application defenders to gain visibility into HTTP(S) traffic and provides a power rules language and API to implement advanced protections. 설치 yum install ...
리눅스 / 명령어 / which, whereis, locate / 명령어 위치 찾기
명령어의 위치를 찾을 때 사용할 수 있는 명령어에는 which, whereis, locate가 있다. 명령어의 위치만 찾을 때는 which를 사용하고, 관련된 파일들의 위치까지 찾을 때는 whereis나 locate를 사용한다. which 명령어로 find 명령어를 찾는다. # which find /usr/bin/find whereis 명령어로 find 명령어를 찾는다. # whereis find find: /usr/bin/find /usr/share/man/man1/find.1.gz locate 명령어로 find 명령어를 찾는다. # locate find /usr/bin/find /usr/bin/find2perl /usr/bin/findmnt /usr/bin/nl-link-ifindex2name /usr/bin/nl-link-name2ifindex /usr/bin/oldfind /usr/lib64/python2.7/modulefinder.py /usr/lib64/python2.7/modulefinder.pyc /usr/lib64/python2.7/modulefinder.pyo /usr/sbin/btrfs-find-root /usr/sbin/findfs /usr/share/bash-completion/completions/findmnt /usr/share/doc/findutils-4.5.11 /usr/share/doc/findutils-4.5.11/AUTHORS /usr/share/doc/findutils-4.5.11/COPYING /usr/share/doc/findutils-4.5.11/ChangeLog /usr/share/doc/findutils-4.5.11/NEWS /usr/share/doc/findutils-4.5.11/README /usr/share/doc/findutils-4.5.11/THANKS /usr/share/doc/findutils-4.5.11/TODO /usr/share/doc/wpa_supplicant-2.6/examples/p2p/p2p_find.py /usr/share/doc/wpa_supplicant-2.6/examples/p2p/p2p_stop_find.py /usr/share/info/find-maint.info.gz /usr/share/info/find.info.gz /usr/share/locale/be/LC_MESSAGES/findutils.mo /usr/share/locale/bg/LC_MESSAGES/findutils.mo /usr/share/locale/ca/LC_MESSAGES/findutils.mo /usr/share/locale/cs/LC_MESSAGES/findutils.mo /usr/share/locale/da/LC_MESSAGES/findutils.mo /usr/share/locale/de/LC_MESSAGES/findutils.mo /usr/share/locale/el/LC_MESSAGES/findutils.mo /usr/share/locale/eo/LC_MESSAGES/findutils.mo /usr/share/locale/es/LC_MESSAGES/findutils.mo /usr/share/locale/et/LC_MESSAGES/findutils.mo /usr/share/locale/fi/LC_MESSAGES/findutils.mo /usr/share/locale/fr/LC_MESSAGES/findutils.mo /usr/share/locale/ga/LC_MESSAGES/findutils.mo /usr/share/locale/gl/LC_MESSAGES/findutils.mo /usr/share/locale/hr/LC_MESSAGES/findutils.mo /usr/share/locale/hu/LC_MESSAGES/findutils.mo /usr/share/locale/id/LC_MESSAGES/findutils.mo /usr/share/locale/it/LC_MESSAGES/findutils.mo /usr/share/locale/ja/LC_MESSAGES/findutils.mo /usr/share/locale/ko/LC_MESSAGES/findutils.mo /usr/share/locale/lg/LC_MESSAGES/findutils.mo /usr/share/locale/lt/LC_MESSAGES/findutils.mo /usr/share/locale/ms/LC_MESSAGES/findutils.mo /usr/share/locale/nl/LC_MESSAGES/findutils.mo /usr/share/locale/pl/LC_MESSAGES/findutils.mo /usr/share/locale/pt/LC_MESSAGES/findutils.mo /usr/share/locale/pt_BR/LC_MESSAGES/findutils.mo /usr/share/locale/ro/LC_MESSAGES/findutils.mo /usr/share/locale/ru/LC_MESSAGES/findutils.mo /usr/share/locale/rw/LC_MESSAGES/findutils.mo /usr/share/locale/sk/LC_MESSAGES/findutils.mo /usr/share/locale/sl/LC_MESSAGES/findutils.mo /usr/share/locale/sr/LC_MESSAGES/findutils.mo /usr/share/locale/sv/LC_MESSAGES/findutils.mo /usr/share/locale/tr/LC_MESSAGES/findutils.mo /usr/share/locale/uk/LC_MESSAGES/findutils.mo /usr/share/locale/vi/LC_MESSAGES/findutils.mo /usr/share/locale/zh_CN/LC_MESSAGES/findutils.mo /usr/share/locale/zh_TW/LC_MESSAGES/findutils.mo /usr/share/man/man1/find.1.gz /usr/share/man/man1/find2perl.1.gz /usr/share/man/man1/oldfind.1.gz /usr/share/man/man8/btrfs-find-root.8.gz /usr/share/man/man8/findfs.8.gz /usr/share/man/man8/findmnt.8.gz locate 명령어는 -n 옵션으로 출력 ...
Ubuntu 24.04 Server / 설치된 패키지 확인하는 방법
우분투에서 설치된 패키지 확인은 apt 또는 dpkg 명령어로 할 수 있다. 출력하는 내용에 차이가 있다. apt 명령어로 설치된 패키지 확인 설치된 모든 패키지를 출력한다. # apt list --installed 설치된 패키지 중 이름에 mariadb가 있는 것을 출력한다. # apt list --installed | grep mariadb dpkg 명령어로 설치된 패키지 확인 설치된 모든 패키지를 출력한다. # dpkg -l 설치된 패키지 중 이름에 ...
리눅스 / 명령어 / man / 명령어의 설명서 출력하는 명령어
man은 manual의 약어로, 명령어의 설명서를 출력하는 명령어이다. man 뒤에 명령어 이름을 넣고 엔터를 누릅니다. 예를 들어 # man rm 은 rm 명령어의 설명서를 출력한다. ↑ 키를 누르면 한 줄 위로 올라가고, ↓ 키를 누르면 한 줄 아래로 내려간다. Page Up 키를 누르면 한 페이지 위로 올라가고, Page Down 키를 누르면 한 페이지 아래로 내려간다. /를 ...
명령어 개요 adduser 사용자 추가하는 명령어. alias 명령어 별칭을 만든다. cal calendar. 달력을 출력하는 명령어. cat concatenate. 파일 내용 출력하는 명령어. cd change directory. 다른 디렉토리로 이동하는 명령어. chmod 파일 또는 디렉토리의 읽기, 쓰기, 실행 권한 설정하는 명령어 chown 파일 또는 디렉토리의 소유자(그룹) 설정하는 명령어 clear 터미널 화면의 내용을 다 지운다. cp copy. 파일 또는 디렉토리 복사. du disk usage. 디스크 사용량 출력. file 파일의 종류를 출력하는 명령어 find 파일 또는 디렉토리를 검색하는 명령어 free 메모리 사용량 ...
리눅스 커널 버전을 확인하는 방법은 여러 가지가 있습니다. 그 중 자주 사용하는 방법 두 가지를 소개합니다. uname uname 명령어는 시스템 정보를 출력하는 데 사용됩니다. -r 옵션을 사용하여 커널 버전을 확인할 수 있습니다. # uname -r 6.8.0-35-generic hostnamectl hostnamectl 명령어는 시스템의 호스트 이름과 관련된 정보를 관리하고 표시합니다. 여기에는 커널 버전 정보도 포함됩니다. # hostnamectl Static hostname: ubuntu-24-01 ...
방법 1 다음과 같이 명령하면 SELinux가 꺼진다. 재부팅하면 다시 SELinux가 켜진다. setenforce 0 만약 다시 SELinux를 사용하고 싶다면 다음과 같이 명령한다. setenforce 1 방법 2 /etc/selinux/config에 다음과 같은 코드가 있다. SELINUX=enforcing 다음과 같이 바꾼다. SELINUX=disabled 시스템을 재부팅하면 적용된다. 방법 1과는 달리 재부팅해도 설정이 유지된다.
Ubuntu 18.04 Server / phpMyAdmin 설치하는 방법
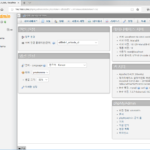
phpMyAdmin은 MySQL, MariaDB를 웹브라우저에서 관리할 수 있게 해주는 소프트웨어입니다. Ubuntu 18.04에 phpMyAdmin을 설치하고 설정하는 방법을 알아보겠습니다. 설치 apt install phpmyadmin 설치하는 과정에서 몇 가지 질문을 합니다. 사용하는 웹서버를 선택합니다. 비밀번호를 정하고... 다시 한 번 입력합니다. Yes를 선택하고 진행하면 설치가 끝납니다. 접속 웹브라우저로 서버 주소에 phpmyadmin을 붙여서 접속합니다. MySQL 또는 MariaDB의 사용자명과 암호를 입력해서 로그인하는데... root 계정으로 접속이 불가능할 수도 있습니다. 만약 root으로 ...
리눅스 / 명령어 / ls / 디렉토리와 파일 목록 출력하는 명령어
ls는 list의 약어로, 디렉토리와 파일 목록을 출력하는 명령어이다. ls 디렉토리명 디렉토리에 속한 디렉토리와 파일 목록을 출력한다. 숨김 파일은 나오지 않는다. 디렉토리명을 생략하면 현재 디렉토리에 속한 디렉토리와 파일 목록을 출력한다. 예를 들어 다음과 같이 명령하면 /var 디렉토리에 속한 디렉토리와 파일 목록을 출력한다. # ls /var ls -a, ls -l -a 옵션을 붙이면 숨김 파일도 출력한다. -l 옵션을 붙이면 소유자, 파일 ...

Rocky Linux 9 / Apache / Virtulahost 만드는 방법
하나의 서버에서 여러 사이트를 운영할 수 있다. Rocky Linux 9에서 Apache 웹서버로 구현하는 방법을 정리한다. Selinux가 활성화되어 있으면 작동하지 않고, 별도의 설정이 필요하다. 여기서는 Selinux를 끄고 진행한다. 목표 하나의 서버에서 두 개의 사이트를 운영한다. http://aaa.manualfactory.net로 접속하면 Welcome to AAA!, http://bbb.manualfactory.net으로 접속하면 Welcome to BBB!를 출력한다. DNS 설정 aaa.manualfactory.net. bbb.manualfactory.net 모두 같은 IP로 가도록 설정한다. 폴더와 파일 생성 /home/aaa ...