리눅스 / 명령어 / cat / 파일 내용 출력하는 명령어
리눅스의 cat(concatenate의 약자) 명령어는 파일의 내용을 화면에 출력하거나 파일을 결합하는 데 사용됩니다. cat 명령어는 주로 텍스트 파일을 다룰 때 유용하며, 여러 개의 파일을 한 번에 읽거나 결합할 수 있습니다.
다음과 같은 두 개의 파일이 있다고 할 때
file1
1-1
1-2
1-3
file2
2-1
2-2
2-3
cat filename
- cat 뒤에 파일 이름을 넣으면 파일 안의 내용을 보여줍니다.
# cat file1
1-1
1-2
1-3
- 파일 이름을 연달아 넣으면 연속하여 파일의 내용을 보여줍니다.
# cat file1 file2
1-1
1-2
1-3
2-1
2-2
2-3
cat filename -n
- -n 옵션을 붙이면 줄번호를 보여줍니다.
# cat -n file1
1 1-1
2 1-2
3 1-3
# cat -n file1 file2
1 1-1
2 1-2
3 1-3
4 2-1
5 2-2
6 2-3
cat filename filename > filename
- cat 뒤에 파일 이름들을 쓰고, > 뒤에 새로운 파일이름을 쓰면, 파일들의 내용들을 합하여 새로운 파일을 만듭니다.
# cat file1 file2 > file3
# cat file3
1-1
1-2
1-3
2-1
2-2
2-3
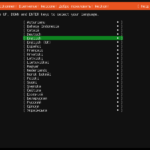
다운로드 Ubuntu Server 다운로드 페이지는 다음과 같다. https://ubuntu.com/download/server 최신 버전에 대한 안내가 주로 있으므로, 구버전을 다운로드하고 싶다면 아래 링크가 편하다. https://mirror.kakao.com/ubuntu-releases/ 가상 머신에 설치한다면 다운로드한 ISO 파일을 그대로 사용하면 되고, 물리 서버에 설치한다면 Rufus 같은 툴을 이용하여 부팅 USB를 만든다. 설치 설치 미디어로 부탕하고 잠시 기다리면 언어를 선택하는 화면이 나온다. 원하는 언어를 선택하고 엔터키를 누른다. 키보드 레이아웃을 선택한다. 네트워크 ...
리눅스 / 명령어 / cp - 복사하는 명령어, mv - 이동하는 명령어
cp는 copy의 약자로 복사하는 명령어, mv는 move의 약자로 이동하는 명령어이다. 복사하기 abc.txt 파일을 def.txt로 이름을 바꾸어 복사한다. cp abc.txt def.txt xyz라는 디렉토리가 없다면 abc.txt 파일을 xyz 파일로 복사한다. xyz라는 디렉토리가 있다면 xyz 디렉토리 안에 abc.txt 파일을 복사한다. cp abc.txt xyz abc.txt 파일을 xyz 디렉토리 안에 def.txt라는 이름으로 복사한다. cp abc.txt xyz/def.txt abc가 디렉토리이고 xyz라는 디렉토리가 없다면, abc 디렉토리를 xyz로 ...
Ubuntu 18.04 Server / phpMyAdmin 설치하는 방법
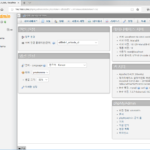
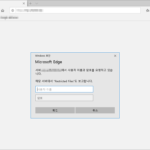
phpMyAdmin은 MySQL, MariaDB를 웹브라우저에서 관리할 수 있게 해주는 소프트웨어입니다. Ubuntu 18.04에 phpMyAdmin을 설치하고 설정하는 방법을 알아보겠습니다. 설치 apt install phpmyadmin 설치하는 과정에서 몇 가지 질문을 합니다. 사용하는 웹서버를 선택합니다. 비밀번호를 정하고... 다시 한 번 입력합니다. Yes를 선택하고 진행하면 설치가 끝납니다. 접속 웹브라우저로 서버 주소에 phpmyadmin을 붙여서 접속합니다. MySQL 또는 MariaDB의 사용자명과 암호를 입력해서 로그인하는데... root 계정으로 접속이 불가능할 수도 있습니다. 만약 root으로 ...
리눅스 / 그룹 / 그룹 조회, 그룹 추가, 그룹 삭제, 그룹 수정
그룹 조회 그룹 목록은 /et/group 파일에 있습니다. cat 명령어로 전체를 조회하거나... cat /etc/group tail 명령어로 마지막 부분을 조회할 수 있습니다. # tail -n 5 /etc/group avahi:x:70: slocate:x:21: rngd:x:974: tcpdump:x:72: vboxsf:x:973: X:Y:Z 형식으로 나오는데, X는 그룹 이름, Y는 그룹 비밀번호, Z는 그룹 ID입니다. 그룹 추가 groupadd 명령으로 그룹을 추가합니다. # groupadd group-1 # tail -n 5 /etc/group slocate:x:21: rngd:x:974: tcpdump:x:72: vboxsf:x:973: group-1:x:1000: 그룹 삭제 groupdel 명령으로 그룹을 삭제합니다. # ...
Ubuntu 18.04 Server / apt / 패키지 설치, 삭제, 업그레이드하는 명령어
Ubuntu에서 패키지를 관리하는 명령어는 여러 가지가 있습니다. 그 중 널리 사용되는 것은 apt-get과 apt입니다. 아래는 apt를 이용하여 패키지를 설치하고 삭제하고 업그레이드하는 방법입니다. 대부분의 경우 apt-get을 사용해도 작동합니다. APT 사용법 패키지 목록을 갱신합니다 # apt update 모든 패키지를 최신 버전으로 업그레이드합니다. # apt upgrade abc 패키지를 설치합니다. 의존성있는 패키지도 함께 설치합니다. # apt install abc abc 패키지를 삭제합니다. 설정 ...

CentOS 7 / rsyslog / 로그 서버 구축하는 방법
CentOS을 설치하면 로그 기록을 위한 rsyslog 패키지가 설치되고 실행됩니다. 로그는 로컬 컴퓨터에 저장되는데, 관리하는 컴퓨터가 여러 대인 경우 각각의 로그를 따로 모니터링하는 것이 불편할 수 있습니다. 그런 경우 하나의 컴퓨터를 로그를 수집하는 서버로 만들어서 그 서버에 로그가 쌓이게 하면, 좀 더 수월하게 로그를 관리할 수 있습니다. rsyslog는 간단한 설정 변경으로 로그 ...
CentOS ISO 다운로드 CentOS ISO 파일은 DVD ISO, Everything ISO, Minimal ISO, NetInstall ISO 등 여러 가지가 있습니다. 이 중에서 가장 파일 크기가 작은 NetInstall ISO 파일로 설치하겠습니다. NetInstall ISO는 설치에 필요한 최소한의 파일만 포함하고 있고, 추가 소프트웨어는 다운로드 받아 설치합니다. CentOS 7의 NetInstall ISO 파일은 다음 링크에서 다운로드를 받을 수 있습니다. http://mirror.navercorp.com/centos/7/isos/x86_64/ 파일 이름은 CentOS-7-x86_64-NetInstall-xxxx.iso입니다. CD로 부팅 ISO 파일을 CD에 ...
DNF는 CentOS 8에 추가된 패키지 관리 명령어입니다. YUM과 사용법이 비슷합니다. 도움말 보기 dnf -h 패키지 목록 보기 dnf list 그룹 목록 보기 dnf grouplist zip 관련 패키지 검색 dnf search zip zip 패키지 정보 출력 dnf info zip Server with GUI 그룹 정보 출력 dnf groupinfo 'Server with GUI' zip 패키지 설치 dnf install zip zip 패키지 삭제 dnf remove zip httpd와 php 설치 dnf install httpd php Server ...
Ubuntu 18.04 Server / Apache / 사용자 인증 만드는 방법
웹사이트의 콘텐츠를 특정 사용자만 볼 수 있게 하는 방법은 여러 가지가 있습니다. 만약 웹서버에 대한 충분한 권한이 있다면, Apache를 이용하여 구현할 수 있습니다. 비밀번호 파일 만들기 비밀번호 파일은 htpasswd 명령어로 만듭니다. /home/auth/ 디렉토리에 passwords라는 이름의 파일을 만들고, 사용자 user1의 비밀번호를 정하고 싶다면 다음과 같이 명령합니다. # htpasswd -c /home/auth/passwords user1 .htaccess 파일 만들기 웹사이트의 루트 ...
Ubuntu 22.04 Server / 백신 프로그램 ClamAV 설치 및 사용법
ClamAV ClamAV는 리눅스에서 사용할 수 있는 백신 프로그램이다. 우분투 패키지에 포함되어 있으므로 apt 명령으로 쉽게 설치하고 사용할 수 있다. 설치 # apt install clamav 사용법 데이터베이스 업데이트 clamav-freshclam 서비스를 중지한다. # systemctl stop clamav-freshclam freshclam 명령으로 업데이트한다. # freshclam clamav-freshclam 서비스를 시작한다. # systemctl start clamav-freshclam 검사 home 디렉토리와 그 하위 디렉토리를 검사한다. # clamscan -r /home 검사 결과는 다음처럼 나온다. ----------- SCAN SUMMARY ----------- Known viruses: ...