Ubuntu 20.04 Server / 고정 IP 설정하는 방법
- 네트워크 설정 파일은 /etc/netplan 디렉토리 안에 있는 yaml 파일이다.
- DHCP로 설치했다면, 설정 파일 내용은 다음과 비슷하게 되어 있다.
# This is the network config written by 'subiquity'
network:
  ethernets:
    enp0s3:
      dhcp4: true
  version: 2
- 다음과 같이 수정하고 저장한다. IP 등은 네트워크 환경에 맞게 적절히 수정한다.
# This is the network config written by 'subiquity'
network:
  ethernets:
    enp0s3:
      addresses: [192.168.0.136/24]
      gateway4: 192.168.0.1
      nameservers:
        addresses: [8.8.8.8,8.8.4.4]
  version: 2
- 다음과 같이 명령하면 설정 변경 사항이 적용된다.
netplan apply
Ubuntu 22.04 Server / ZIP 압축 파일 푸는 방법
ZIP 파일을 압축 해제하기 위해서는 unzip 패키지가 필요하다. # apt install unzip xxx.zip 파일을 압축 해제하려면 다음과 같이 명령한다. # unzip xxx.zip 다음과 같이 명령하여 도움말을 볼 수 있다. # unzip -h 결과는 다음과 같다. UnZip 6.00 of 20 April 2009, by Debian. Original by Info-ZIP. Usage: unzip Default ...
Ubuntu 20.04 Server / GUI 설치하는 방법
Ubuntu Server는 CLI(Command Line Interface) 환경으로 설치된다. 그런데 어떤 작업은 GUI(Graphical Uer Interface) 환경에서 하는 것이 편하다. 만약 GUI 환경이 필요하다면 설치하여 사용할 수 있다. GUI 패키지에는 kubuntu-desktop lubuntu-desktop ubuntu-desktop ubuntu-desktop-minimal xubuntu-desktop 등이 있다. 주로 ubuntu-desktop 또는 ubuntu-desktop-minimal을 사용하는 듯 하다. 예를 들어 ubuntu-desktop-minimal을 설치한다면, 다음과 같이 명령하면 된다. # apt install ubuntu-desktop-minimal Minimal임에도 불구하고 꽤 많은 저장소 공간이 필요하다. After ...
다운로드 Ubuntu Server 다운로드 페이지는 다음과 같다. https://ubuntu.com/download/server 최신 버전에 대한 안내가 주로 있으므로, 구버전을 다운로드하고 싶다면 아래 링크가 편하다. https://mirror.kakao.com/ubuntu-releases/ 가상 머신에 설치한다면 다운로드한 ISO 파일을 그대로 사용하면 되고, 물리 서버에 설치한다면 Rufus 같은 툴을 이용하여 부팅 USB를 만든다. 설치 설치 미디어로 부탕하고 잠시 기다리면 언어를 선택하는 화면이 나온다. 원하는 언어를 선택하고 엔터키를 누른다. 키보드 레이아웃을 선택한다. 네트워크 ...
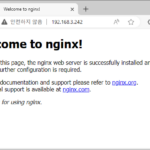
Ubuntu 22.04 Server / NGINX / 설치와 설정
Nginx는 높은 성능과 안정성을 제공하는 웹 서버 소프트웨어로, 웹 서버 외에도 리버스 프록시, 로드 밸런서, 메일 프록시 등의 기능을 수행할 수 있다. Igor Sysoev가 2004년에 처음 개발했으며, 현재는 오픈 소스 소프트웨어로 널리 사용되고 있다. 가정 Ubuntu 22.04 Server의 IP는 192.168.3.242이고, 내 컴퓨터에서 IP로 접근 가능하다. 내 컴퓨터의 OS는 Windows이다. 설치 nginx 패키지 설치 다음과 같이 명령하여 ...
Ubuntu 20.04 Server / 고정 IP 설정하는 방법
네트워크 설정 파일은 /etc/netplan 디렉토리 안에 있는 yaml 파일이다. DHCP로 설치했다면, 설정 파일 내용은 다음과 비슷하게 되어 있다. # This is the network config written by 'subiquity' network: ethernets: enp0s3: dhcp4: true version: 2 다음과 같이 수정하고 저장한다. IP 등은 네트워크 환경에 맞게 적절히 ...
Ubuntu 24.04 Server / 고정 IP 설정하는 방법
네트워크 설정 파일은 /etc/netplan 디렉토리 안에 있는 yaml 파일입니다. 파일 이름은 시스템마다 다를 수 있습니다. # ll /etc/netplan total 12 drwxr-xr-x 2 root root 4096 Apr 27 23:00 ./ drwxr-xr-x 108 root root 4096 Apr 27 23:06 ../ -rw------- 1 root root 389 Apr 27 23:00 50-cloud-init.yaml DHCP라면 설정 파일이 다음과 ...
Ubuntu 22.04 Server / 백신 프로그램 ClamAV 설치 및 사용법
ClamAV ClamAV는 리눅스에서 사용할 수 있는 백신 프로그램이다. 우분투 패키지에 포함되어 있으므로 apt 명령으로 쉽게 설치하고 사용할 수 있다. 설치 # apt install clamav 사용법 데이터베이스 업데이트 clamav-freshclam 서비스를 중지한다. # systemctl stop clamav-freshclam freshclam 명령으로 업데이트한다. # freshclam clamav-freshclam 서비스를 시작한다. # systemctl start clamav-freshclam 검사 home 디렉토리와 그 하위 디렉토리를 검사한다. # clamscan -r /home 검사 결과는 다음처럼 나온다. ----------- SCAN SUMMARY ----------- Known viruses: ...
Ubuntu 16.04 Server / PHP / 메모리 늘리는 방법
PHP 설정은 php.ini에서 한다. Ubuntu 16.04에서 php.ini의 위치는 /etc/php/7.0/apache2/php.ini 이다. PHP 버전에 따라 7.0은 다른 숫자일 수 있다. 메모리를 늘리기 위해 수정해야 할 것은 memory_limit이다. 기본값은 128M이다. 128을 적절히 변경한다. memory_limit = 128M 변경한 설정이 적용되도록 하려면 웹서버를 다시 시작하거나 다시 로드한다. Apache 웹서버라면 다음과 같이 명령하여 다시 시작할 수 있고, # service apache2 restart 다음과 같이 ...
Ubuntu 18.04 Server / Apache / 사용자 인증 만드는 방법
웹사이트의 콘텐츠를 특정 사용자만 볼 수 있게 하는 방법은 여러 가지가 있습니다. 만약 웹서버에 대한 충분한 권한이 있다면, Apache를 이용하여 구현할 수 있습니다. 비밀번호 파일 만들기 비밀번호 파일은 htpasswd 명령어로 만듭니다. /home/auth/ 디렉토리에 passwords라는 이름의 파일을 만들고, 사용자 user1의 비밀번호를 정하고 싶다면 다음과 같이 명령합니다. # htpasswd -c /home/auth/passwords user1 .htaccess 파일 만들기 웹사이트의 루트 ...
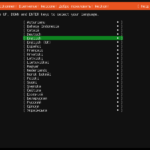
Ubuntu 18.04 Server / 시간대(time zone) 설정하는 방법
현재 서버의 시간대 확인 현재 서버에 설정된 시간대는 date 명령어로 확인할 수 있다. # date 시간대 설정 방법 1 - dpkg-reconfigure tzdata 시간대를 설정하고 싶다면 다음과 같이 명령한다. # dpkg-reconfigure tzdata 한국이라면 Asia를 선택하고 Seoul을 선택합니다. 시간대 설정 방법 2 - tzselect tzselect 명령으로 설정할 수 있다. 번호를 입력하여 시간대를 정한다. # tzselect Please identify a location so that time ...