리눅스 / LVM / 만드는 방법, 수정하는 방법, 삭제하는 방법
1TB 디스크와 2TB 디스크를 추가했다고 하자. 디스크 크기에 맞게 그대로 사용할 수도 있지만, 3TB 하나인 것처럼 사용하거나 1.5TB 두 개인 것처럼 사용하고 싶을 수도 있다. 즉, 물리적인 디스크 크기와 무관하게 자유롭게 볼륨을 만들고 싶은 것이다.
이럴 때 사용하는 것이 LVM(Logical Volume Manager)이다. 여러 개의 볼륨을 하나로 묶은 후 다시 배분하여 사용한다.(이렇게 만든 볼륨을 논리적 볼륨이라고 한다.)
LVM을 이용하여 논리적 볼륨을 만들고, 수정하고, 삭제하는 방법을 알아본다.
LVM 만들기
LVM으로 볼륨을 만드는 순서는 다음과 같다.
- 물리적 볼륨을 만든다.
- 물리적 볼륨을 묶어서 볼륨 그룹을 만든다.
- 볼륨 그룹에 논리적 볼륨을 만든다.
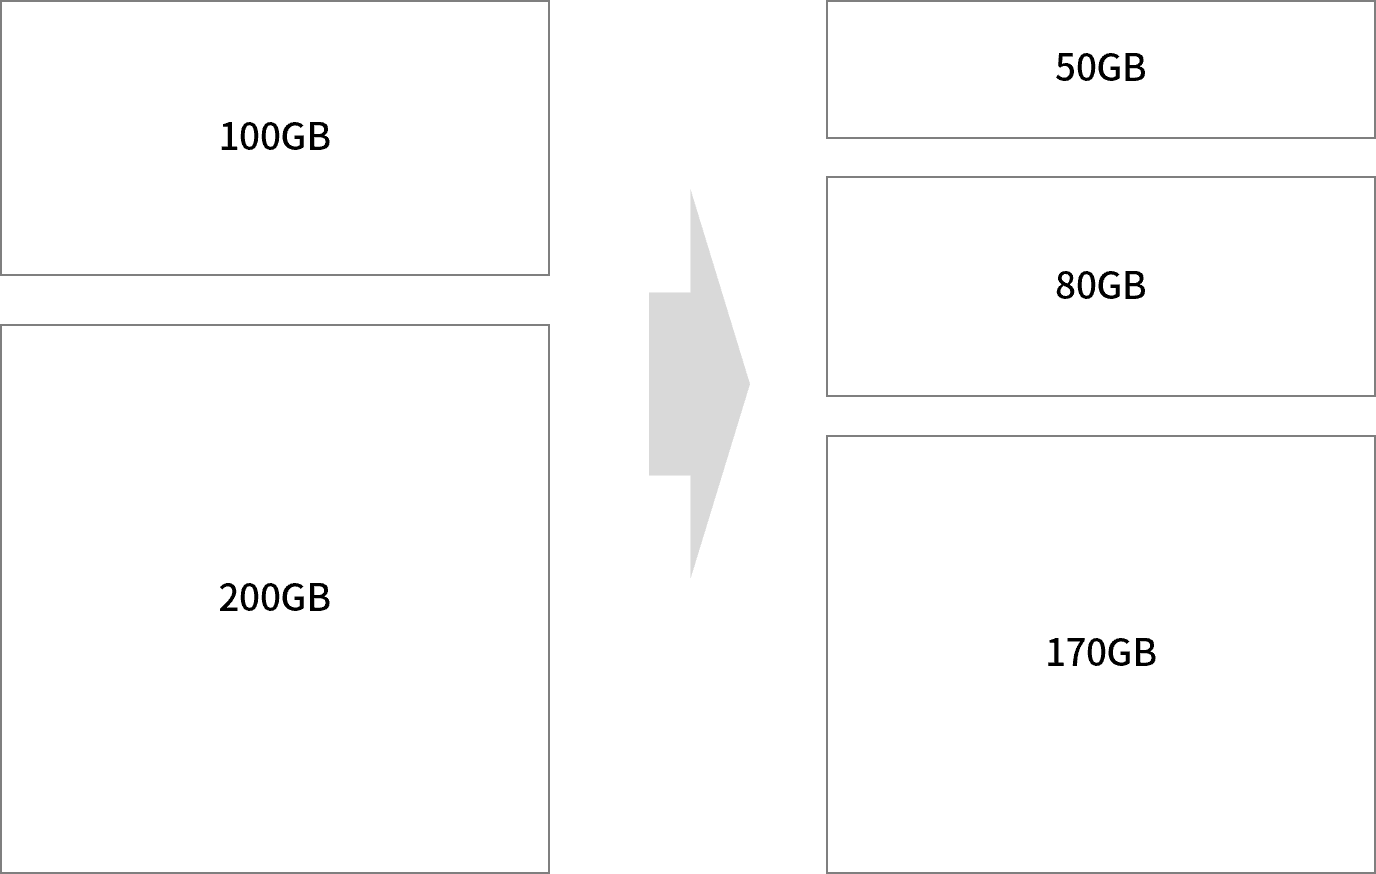
간단한 예로 어떻게 구성하는지 알아보자. 목표는 100GB 디스크과 200GB 디스크로 50GB, 80GB, 170GB 볼륨을 만드는 것이다.
파티션 만들기
- 현재 상태는 다음과 같다. 디스크 두 개를 추가해서 /dev/sdb와 /dev/sdc가 생겼고, /dev/sdb의 크기는 100GB, /dev/sdc의 크기는 200GB이다.
# ls /dev/sd*
/dev/sda  /dev/sda1  /dev/sda2  /dev/sda3  /dev/sdb  /dev/sdc
- fdisk로 파티션을 만든다. 주의할 점은 타입을 8e로 해야 한다는 것이다.
# fdisk /dev/sdb

Welcome to fdisk (util-linux 2.34).
Changes will remain in memory only, until you decide to write them.
Be careful before using the write command.

Device does not contain a recognized partition table.
Created a new DOS disklabel with disk identifier 0xa066b799.

Command (m for help): n
Partition type
   p   primary (0 primary, 0 extended, 4 free)
   e   extended (container for logical partitions)
Select (default p): p
Partition number (1-4, default 1): 1
First sector (2048-209715199, default 2048):
Last sector, +/-sectors or +/-size{K,M,G,T,P} (2048-209715199, default 209715199):

Created a new partition 1 of type 'Linux' and of size 100 GiB.

Command (m for help): t
Selected partition 1
Hex code (type L to list all codes): 8e
Changed type of partition 'Linux' to 'Linux LVM'.

Command (m for help): w
The partition table has been altered.
Calling ioctl() to re-read partition table.
Syncing disks.
- 파티션을 만든 후의 상태는 다음과 같다.
# ls /dev/sd*
/dev/sda  /dev/sda1  /dev/sda2  /dev/sda3  /dev/sdb  /dev/sdb1  /dev/sdc  /dev/sdc1
물리적 볼륨 만들기
- /dev/sdb1과 /dev/sdc1로 물리적 볼륨(Physical Volume)을 만든다.
# pvcreate /dev/sdb1
  Physical volume "/dev/sdb1" successfully created.
root@ubuntu-2004-s-02:~# pvcreate /dev/sdc1
  Physical volume "/dev/sdc1" successfully created.
볼륨 그룹 만들기
- /dev/sdb1과 /dev/sdc1를 볼륨 그룹으로 만든다.
- VG-01은 볼륨 그룹의 이름으로, 다른 것으로 만들어도 된다.
# vgcreate VG-01 /dev/sdb1 /dev/sdc1
  Volume group "VG-01" successfully created
논리적 볼륨 만들기
- VG-01 볼륨 그룹에 50GB 크기의 논리적 볼륨(Logical Volume)을 만든다.
- LG-01은 논리적 볼륨의 이름으로, 다른 것으로 만들어도 된다.
# lvcreate --size 50G --name LG-01 VG-01
  Logical volume "LG-01" created.
- LG-02라는 이름의 80GB 크기의 논리적 볼륨을 만든다.
# lvcreate --size 80G --name LG-02 VG-01
  Logical volume "LG-02" created.
- 나머지 공간을 다 사용하는 LG-03이라는 이름의 논리적 볼륨을 만든다.
# lvcreate --extents 100%FREE --name LG-03 VG-01
  Logical volume "LG-03" created.
포맷하고 마운트하기
- 논리적 볼륨을 포맷한다. 아래는 LG-01을 EXT4 형식으로 포맷한 것이다.
# mkfs.ext4 /dev/VG-01/LG-01
mke2fs 1.45.5 (07-Jan-2020)
Creating filesystem with 13107200 4k blocks and 3276800 inodes
Filesystem UUID: ee2a0e20-db9f-4e38-b3d1-d46f00ccc215
Superblock backups stored on blocks:
        32768, 98304, 163840, 229376, 294912, 819200, 884736, 1605632, 2654208,
        4096000, 7962624, 11239424

Allocating group tables: done
Writing inode tables: done
Creating journal (65536 blocks): done
Writing superblocks and filesystem accounting information: done
- 적당한 이름의 폴더를 만들고 마운트한다.
# mkdir /LG-01
# mount /dev/VG-01/LG-01 /LG-01
- 다음은 세 개의 논리적 볼륨을 포맷하고 마운트한 결과이다. 제일 아래 세 줄에 논리적 볼륨이 추가된 것을 확인할 수 있다.
# df -h
Filesystem                         Size  Used Avail Use% Mounted on
udev                               1.9G     0  1.9G   0% /dev
tmpfs                              394M  1.4M  393M   1% /run
/dev/mapper/ubuntu--vg-ubuntu--lv  196G  8.8G  178G   5% /
tmpfs                              2.0G     0  2.0G   0% /dev/shm
tmpfs                              5.0M  4.0K  5.0M   1% /run/lock
tmpfs                              2.0G     0  2.0G   0% /sys/fs/cgroup
/dev/loop1                          62M   62M     0 100% /snap/core20/1169
/dev/loop2                          71M   71M     0 100% /snap/lxd/21029
/dev/loop3                          68M   68M     0 100% /snap/lxd/21545
/dev/sda2                          976M  112M  798M  13% /boot
/dev/loop4                          56M   56M     0 100% /snap/core18/2128
/dev/loop5                          33M   33M     0 100% /snap/snapd/13170
/dev/loop0                          62M   62M     0 100% /snap/core20/1081
/dev/loop6                          33M   33M     0 100% /snap/snapd/12704
tmpfs                              394M   36K  394M   1% /run/user/128
tmpfs                              394M     0  394M   0% /run/user/0
/dev/mapper/VG--01-LG--01           49G   53M   47G   1% /LG-01
/dev/mapper/VG--01-LG--02           79G   57M   75G   1% /LG-02
/dev/mapper/VG--01-LG--03          167G   61M  158G   1% /LG-03
LVM 수정하기
볼륨 추가
볼륨 그룹에 볼륨을 추가하여 전체 공간을 확장할 수 있다. 위 예제에 이어 200GB 하드 디스크를 추가로 장착했다고 하면...
- 디스크를 추가하면 아래와 같은 상태가 된다. /dev/sdd가 추가한 디스크이다.
# ls /dev/sd*
/dev/sda  /dev/sda1  /dev/sda2  /dev/sda3  /dev/sdb  /dev/sdb1  /dev/sdc  /dev/sdc1  /dev/sdd
- Linux LVM 파티션을 만든다.
# fdisk /dev/sdd

Welcome to fdisk (util-linux 2.34).
Changes will remain in memory only, until you decide to write them.
Be careful before using the write command.

Device does not contain a recognized partition table.
Created a new DOS disklabel with disk identifier 0x8aa237e3.

Command (m for help): n
Partition type
   p   primary (0 primary, 0 extended, 4 free)
   e   extended (container for logical partitions)
Select (default p): p
Partition number (1-4, default 1):
First sector (2048-419430399, default 2048):
Last sector, +/-sectors or +/-size{K,M,G,T,P} (2048-419430399, default 419430399):

Created a new partition 1 of type 'Linux' and of size 200 GiB.

Command (m for help): t
Selected partition 1
Hex code (type L to list all codes): 8e
Changed type of partition 'Linux' to 'Linux LVM'.

Command (m for help): w
The partition table has been altered.
Calling ioctl() to re-read partition table.
Syncing disks.
- 물리적 볼륨을 만든다.
# pvcreate /dev/sdd1
  Physical volume "/dev/sdd1" successfully created.
- VG-01 볼륨 그룹에 추가한다.
# vgextend VG-01 /dev/sdd1
  Volume group "VG-01" successfully extended
- 200GB의 여유 공간이 생긴다.
# vgdisplay VG-01
  --- Volume group ---
  VG Name               VG-01
  System ID
  Format                lvm2
  Metadata Areas        3
  Metadata Sequence No  9
  VG Access             read/write
  VG Status             resizable
  MAX LV                0
  Cur LV                3
  Open LV               3
  Max PV                0
  Cur PV                3
  Act PV                3
  VG Size               <499.99 GiB
  PE Size               4.00 MiB
  Total PE              127997
  Alloc PE / Size       76798 / 299.99 GiB
  Free  PE / Size       51199 / <200.00 GiB
  VG UUID               YLV2F1-x00c-4CZt-LsCh-3q9O-iE3L-Ynx2vG
확장된 공간에 새로운 논리적 볼륨을 만들거나, 기존 논리적 볼륨의 크기를 늘릴 수 있다.
논리적 볼륨 확장하기
- lvextend 명령어로 논리적 볼륨의 크기를 확장한다. 아래는 /dev/VG-01/LG-01의 크기를 1GB 늘리는 것.
# lvextend -L+1G /dev/VG-01/LG-01
  Size of logical volume VG-01/LG-01 changed from 50.00 GiB (12800 extents) to 51.00 GiB (13056 extents).
  Logical volume VG-01/LG-01 successfully resized.
- resize2fs 명령어로 파일 시스템의 크기를 확장해야 반영된다.
# resize2fs /dev/VG-01/LG-01
resize2fs 1.45.5 (07-Jan-2020)
Filesystem at /dev/VG-01/LG-01 is mounted on /LG-01; on-line resizing required
old_desc_blocks = 7, new_desc_blocks = 7
The filesystem on /dev/VG-01/LG-01 is now 13369344 (4k) blocks long.
- 아래는 /dev/VG-01/LG-01의 크기를 60GB로 늘리는 것. 마찬가지로 resize2fs 명령으로 파일 시스템 크기를 확장한다.
# lvextend -L60G /dev/VG-01/LG-01
  Size of logical volume VG-01/LG-01 changed from 51.00 GiB (13056 extents) to 60.00 GiB (15360 extents).
  Logical volume VG-01/LG-01 successfully resized.
# resize2fs /dev/VG-01/LG-01
resize2fs 1.45.5 (07-Jan-2020)
Filesystem at /dev/VG-01/LG-01 is mounted on /LG-01; on-line resizing required
old_desc_blocks = 7, new_desc_blocks = 8
The filesystem on /dev/VG-01/LG-01 is now 15728640 (4k) blocks long.
LVM 삭제하기
LVM 삭제는 LVM 생성의 역순으로 진행한다.
논리적 볼륨 삭제하기
lvremove 명령어로 논리적 볼륨을 삭제한다. 아래는 /dev/VG-01/LG-03를 삭제하는 것.
# lvremove /dev/VG-01/LG-03
Do you really want to remove and DISCARD active logical volume VG-01/LG-03? [y/n]: y
  Logical volume "LG-03" successfully removed
볼륨 그룹 삭제하기
vgremove 명령어로 볼륨 그룹을 삭제한다. 아래는 VG-01을 삭제하는 것으로, 볼륨 그룹 안에 논리적 볼륨이 남아 있으면 삭제할 것인지 묻는다.
# vgremove VG-01
Do you really want to remove volume group "VG-01" containing 2 logical volumes? [y/n]: y
Do you really want to remove and DISCARD active logical volume VG-01/LG-01? [y/n]: y
  Logical volume "LG-01" successfully removed
Do you really want to remove and DISCARD active logical volume VG-01/LG-02? [y/n]: y
  Logical volume "LG-02" successfully removed
  Volume group "VG-01" successfully removed
물리적 볼륨 삭제하기
pvremove 명령어로 물리적 볼륨을 삭제한다. 아래는 /dev/sdd1을 삭제하는 것.
# pvremove /dev/sdd1
  Labels on physical volume "/dev/sdd1" successfully wiped.

Rocky Linux 8 / root 계정으로 ssh 접속 가능하게 설정하는 방법
Rocky Linux를 설치할 때 가능하게 설정하지 않았다면, root 계정으로 ssh 접속을 할 수 없다. 보안 상 권장되는 설정이나, 테스트나 공부 목적 등으로 root 계정으로 ssh 접속하는 게 더 좋은 상황이라면, 다음과 같이 하여 접속을 허용할 수 있다. vi나 nano 같은 텍스트 에디터로 /etc/ssh/sshd_config 파일을 연다. 제일 밑에 다음 코드를 추가하고, 저장한다. PermitRootLogin yes 다음과 같이 ...
Ubuntu 24.04 Server / 설치된 패키지 확인하는 방법
우분투에서 설치된 패키지 확인은 apt 또는 dpkg 명령어로 할 수 있다. 출력하는 내용에 차이가 있다. apt 명령어로 설치된 패키지 확인 설치된 모든 패키지를 출력한다. # apt list --installed 설치된 패키지 중 이름에 mariadb가 있는 것을 출력한다. # apt list --installed | grep mariadb dpkg 명령어로 설치된 패키지 확인 설치된 모든 패키지를 출력한다. # dpkg -l 설치된 패키지 중 이름에 ...
리눅스 / chown, chmod / 파일 또는 디렉토리 소유자, 소유그룹, 권한 설정
chown과 chmod는 파일 및 디렉토리의 권한과 소유자를 관리하는 데 사용되는 Linux 명령어입니다. 정보 확인 ls 명령어에 -l 옵션을 붙여서 파일 또는 디렉토리의 권한과 소유자(그룹)을 확인할 수 있습니다. 제일 앞에 있는 문자는 디렉토리인지 파일인지는 나타냅니다. d는 디렉토리라는 뜻이고, -는 파일이라는 뜻입니다. 그 다음 3개의 문자열은 소유자의 권한을, 그 다음 3개의 문자열은 소유그룹의 권한을, 그 다음 ...
리눅스 / 로그아웃 명령어, 재부팅 명령어, 종료 명령어
로그아웃 명령어 # logout # exit 재부팅 명령어 즉시 재부팅 # reboot # shutdown -r now # init 6 일정 시간 또는 일정 시간 후 재부팅 10분 후 재부팅 # shutdown -r 10 12시에 재부팅 # shutdown -r 12:00 취소 # shutdown -c 종료 명령어 즉시 종료 # poweroff # shutdown -h now # shutdown -P now # halt -p # init 0 일정 시간 또는 일정 시간 후에 종료 10분 후에 종료 # ...
Rocky Linux 9 / SSH / 포트 변경하는 방법
SSH는 22 포트를 사용한다. 알려진 포트이므로 다른 포트로 변경하는 것이 보안상 좋다. Rocky Linux 9에서 SSH 포트 변경하는 방법은 다음과 같다. 포트를 1980으로 바꾼다고 가정한다. /etc/ssh/sshd_config에서 다음의 코드를... #Port 22 다음으로 변경한다. Port 1980 SELINUX가 활성화되어 있다면 다음과 같이 명령하여 1980 포트를 사용할 수 있게 만든다. semanage port -a -t ssh_port_t -p tcp 1980 만약 다음과 같은 ...
파일 이름 바꾸기 mv는 파일을 이동시키는 명령어이다. 이 명령어를 이용해서 파일 이름을 바꿀 수 있다. 예를 들어 다음은 abc.txt를 xyz.txt로 바꾼다. # mv abc.txt xyz.txt 디렉토리 이름 바꾸기 디렉토리 이름을 바꾸는 것도 파일 이름 변경과 같다. 다음은 abc 디렉토리의 이름을 xyz로 바꾼다. # mv abc xyz
리눅스 / 명령어 / cal / 달력을 출력하는 명령어
cal은 달력을 출력하는 명령어이다. 아무 옵션 없이 사용하면 현재 날짜가 속한 달의 달력을 출력한다. cal October 2022 Su Mo Tu We Th Fr Sa 1 2 3 4 5 ...

CentOS 7 / Apache / 하나의 서버에 여러 사이트 운영하기
하나의 서버에 하나의 사이트만 운영하는 것이 가장 이상적일 것입니다. 하지만 사이트 접속자가 많지 않거나 서버 사양이 훌륭하다면 여러 사이트를 하나의 서버에서 운영하는 게 경제적입니다. CentOS에 Apache 웹서버를 설치하고 운영하는 경우 여러 사이트를 운영할 수 있게 설정하는 방법을 요약해보겠습니다. 네임 서버 설정 각 도메인의 네임 서버의 호스트 IP를 웹서버 아이피로 설정합니다. 디렉토리 만들기 한 서버에 aaa.com과 ...
Ubuntu 18.04 Server / PHP 최신 버전으로 업그레이드하는 방법
Ubuntu 패키지로 설치한 PHP 버전보다 PHP 최신 버전이 더 높을 수 있습니다. 예를 들어 패키지로 설치한 PHP의 버전은 7.0, 최신 버전은 7.2일 수 있다는 것이죠. 만약 최신 버전의 PHP를 사용해야 한다면 다음의 방법으로 설치할 수 있습니다. PHP를 처음 설치하는 경우 저장소를 추가합니다. # add-apt-repository ppa:ondrej/php 패키지 정보를 업데이트합니다. # apt-get update PHP를 설치합니다. # apt-get install php PHP가 ...
Ubuntu 20.04 Server / Samba / 설치하고 공유 폴더 만드는 방법
Samba를 이용하여 Ubuntu Server에 공유 폴더를 만들고, Windows 클라이언트에서 접속하는 방법을 알아본다. Samba 설치 Samba를 설치한다. 설치하면 바로 시작하고, 재부팅을 해도 자동으로 시작한다. apt install samba 공유할 폴더를 만들고 권한을 777로 설정한다. mkdir /sharedfolder chmod 777 /sharedfolder 설정 파일은 /etc/samba/smb.conf이다. 텍스트 에디터로 열고 제일 밑에 다음 코드를 추가한다. 폴더 이름은 sharedfolder이지만, 네트워크에서는 Shared Folder로 보인다. comment = ...