리눅스 / 명령어 / passwd / 사용자 암호 설정 명령어
사용자의 비밀번호 설정은 passwd 명령어로 한다.
비밀번호 만들기, 변경하기
- 사용자 jb의 비밀번호를 만들거나 변경한다.
passwd jb
사용자을 적지 않으면 현재 로그인한 사용자의 비밀번호를 만들거나 변경한다.
비밀번호 삭제하기
- 사용자 jb의 비밀번호를 삭제한다. 사용자는 비밀번호 입력 없이 로그인 가능하다.
passwd -d jb
비밀번호 잠그기, 잠금 풀기
- 사용자 jb를 잠근다. 즉, 사용자는 로그인하지 못한다.
passwd -l jb
- 사용자 jb의 잠금을 푼다.
passwd -u jb
비밀번호 만료시키기
- 사용자 jb의 비밀번호를 만료시킨다. 로그인하면 비밀번호를 변경하라고 한다.
passwd -e jb
사용법 출력하기
- 사용법과 옵션을 출력한다.
passwd -h
- 결과는 다음과 같다.
Usage: passwd [options] [LOGIN]

Options:
  -a, --all                     report password status on all accounts
  -d, --delete                  delete the password for the named account
  -e, --expire                  force expire the password for the named account
  -h, --help                    display this help message and exit
  -k, --keep-tokens             change password only if expired
  -i, --inactive INACTIVE       set password inactive after expiration
                                to INACTIVE
  -l, --lock                    lock the password of the named account
  -n, --mindays MIN_DAYS        set minimum number of days before password
                                change to MIN_DAYS
  -q, --quiet                   quiet mode
  -r, --repository REPOSITORY   change password in REPOSITORY repository
  -R, --root CHROOT_DIR         directory to chroot into
  -S, --status                  report password status on the named account
  -u, --unlock                  unlock the password of the named account
  -w, --warndays WARN_DAYS      set expiration warning days to WARN_DAYS
  -x, --maxdays MAX_DAYS        set maximum number of days before password
                                change to MAX_DAYS
현재 언어 확인하기 locale 명령어로 현재 언어를 확인할 수 있다. # locale LANG=en_US.UTF-8 LANGUAGE= LC_CTYPE="en_US.UTF-8" LC_NUMERIC="en_US.UTF-8" LC_TIME="en_US.UTF-8" LC_COLLATE="en_US.UTF-8" LC_MONETARY="en_US.UTF-8" LC_MESSAGES="en_US.UTF-8" LC_PAPER="en_US.UTF-8" LC_NAME="en_US.UTF-8" LC_ADDRESS="en_US.UTF-8" LC_TELEPHONE="en_US.UTF-8" LC_MEASUREMENT="en_US.UTF-8" LC_IDENTIFICATION="en_US.UTF-8" LC_ALL= 언어 추가하기 사용 가능한 언어는 locale -a로 확인할 수 있다. # locale -a C C.utf8 en_US.utf8 POSIX 예를 들어 한국어를 추가하고 싶다면 아래와 같이 명령한다. # apt install language-pack-ko locale -a로 설치 확인을 한다. # locale -a C C.utf8 en_US.utf8 ko_KR.utf8 POSIX 언어 변경하기 다음과 같이 명령하면 사용하는 언어가 한국어로 바뀐다. update-locale LANG=ko_KR.utf8 로그아웃 후 다시 로그인하거나, 컴퓨터를 다시 시작하면 ...
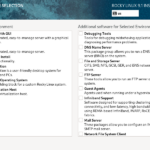
다운로드 아래 링크에서 ISO 파일을 다운로드한다. https://rockylinux.org/download Boot, Minimal, DVD 세 가지가 있는데, 다음과 같이 설명되어 있다. Boot Used to install the operating system from another source (such as a HTTP repository of the binary files). Can also be used to enter Rescue Mode. Minimal Used to install the operating system from another source (such as a ...
Ubuntu 16.04 Server / 고정 IP 설정하는 방법
네트워크 설정 파일은 /etc/network/interfaces이다. 우분투를 DHCP로 설치했다면 설정 파일의 내용은 다음과 비슷하게 되어 있다. # The primary network interface auto enp0s3 iface enp0s3 inet dhcp 이를 다음처럼 변경하고 저장한다. xxx.xxx.xxx.xxx는 네트워크 환경에 맞게 수정한다. # The primary network interface auto enp0s3 iface enp0s3 inet static address xxx.xxx.xxx.xxx netmask xxx.xxx.xxx.xxx gateway xxx.xxx.xxx.xxx dns-nameservers xxx.xxx.xxx.xxx 다음과 같이 명령하여 네트워크를 재시작한다. systemctl restart networking.service 만약 위와 같이 해도 ...
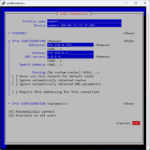
보통 Rocky Linux를 설치할 때 IP를 설정하나, 여러 가지 이유로 IP 설정을 다시 해야 하는 경우가 있다. IP를 설정하는 두 가지 방법을 소개한다. TUI 네트워크 설정 파일을 수정하는 것보다는 NetworkManager Text User Interface(nmtui)를 이용하는 게 편하다. nmtui를 실행한다. Edit a connection을 선택한다. 설정하려는 네트워크 카드를 선택한다. 현재 설정이 나오는데... 적절히 설정한다. 다음과 같이 명령하여 반영한다. systemctl restart NetworkManager GUI Settings를 연다. Network에서 ...
리눅스 / 사용자 / 사용자 조회, 사용자 추가, 사용자 삭제, 사용자 수정
사용자 조회 모든 사용자를 출력합니다. # cat /etc/passwd root:x:0:0:root:/root:/bin/bash bin:x:1:1:bin:/bin:/sbin/nologin daemon:x:2:2:daemon:/sbin:/sbin/nologin adm:x:3:4:adm:/var/adm:/sbin/nologin lp:x:4:7:lp:/var/spool/lpd:/sbin/nologin sync:x:5:0:sync:/sbin:/bin/sync shutdown:x:6:0:shutdown:/sbin:/sbin/shutdown halt:x:7:0:halt:/sbin:/sbin/halt mail:x:8:12:mail:/var/spool/mail:/sbin/nologin operator:x:11:0:operator:/root:/sbin/nologin games:x:12:100:games:/usr/games:/sbin/nologin ftp:x:14:50:FTP User:/var/ftp:/sbin/nologin ... root과 useradd 또는 adduser를 통해 생성한 사용자 계정을 출력합니다. # grep /bin/bash /etc/passwd root:x:0:0:root:/root:/bin/bash jb:x:1000:1000:JB:/home/jb:/bin/bash 사용자 추가 useradd jb 사용자를 만듭니다. useradd jb 사용자 홈 디렉토리도 같이 만들고 싶다면 -d 옵션을 사용합니다. useradd jb -d /home/jbdir jb 사용자의 비밀번호를 만듭니다. passwd jb adduser adduser 명령어로 사용자를 추가할 수 있습니다. useradd와는 달리 사용자 홈 디렉토리를 자동으로 만들고, 비밀번호 ...
Ubuntu 16.04 / phpMyAdmin / 특정 IP에서만 접속 가능하게 만드는 방법
우분투 16.04에서 phpMyAdmin을 패키지로 설치했을 때, 기본 설정은 모든 IP에서 접속 가능입니다. 만약 특정 IP에서만 접속 가능하게 하려면 /etc/apache2/conf-available/phpmyadmin.conf에 다음 코드를 추가합니다. <Directory /usr/share/phpmyadmin> Order deny,allow Deny from all Allow from xxx.xxx.xxx.xxx </Directory> xxx.xxx.xxx.xxx는 접속하려는 IP로 바꿉니다. 여러 IP를 설정하고 싶을 때는 띄어쓰기로 구분합니다. <Directory /usr/share/phpmyadmin> Order deny,allow Deny from all ...

현재 언어 확인하기 # localectl System Locale: LANG=en_US.UTF-8 VC Keymap: us X11 Layout: us 사용 가능한 언어 확인하기 # localectl list-locales C.utf8 en_AG en_AU en_AU.utf8 en_BW en_BW.utf8 en_CA en_CA.utf8 en_DK en_DK.utf8 en_GB en_GB.iso885915 en_GB.utf8 en_HK en_HK.utf8 en_IE en_IE.utf8 en_IE@euro en_IL en_IN en_NG en_NZ en_NZ.utf8 en_PH en_PH.utf8 en_SC.utf8 en_SG en_SG.utf8 en_US en_US.iso885915 en_US.utf8 en_ZA en_ZA.utf8 en_ZM en_ZW en_ZW.utf8 ko_KR.euckr ko_KR.utf8 언어를 한글로 변경하기 # localectl set-locale LANG=ko_KR.utf8 # localectl System Locale: LANG=ko_KR.utf8 ...
리눅스 / 스왑 메모리(Swap Memory) 만드는 방법
리눅스 시스템이 메모리를 다 사용하면 프로그램이 멈추는 등 문제가 발생한다. 이때 스왑 메모리(Swap Memory) 늘려서 메모리 부족 문제를 해결할 수 있다. 스왑 파일 만들기 적당한 디렉토리에 적당한 이름의 파일을 적당한 크기로 만든다. 예를 들어 다음과 같이 하면, 루트 디렉토리에 jb-swap이라는 파일을 2G의 크기로 만든다. # fallocate -l 2G /jb-swap root만 읽고 쓸 수 있게 권한 ...
Ubuntu 18.04 Server / Apache / 사용자 인증 만드는 방법
웹사이트의 콘텐츠를 특정 사용자만 볼 수 있게 하는 방법은 여러 가지가 있습니다. 만약 웹서버에 대한 충분한 권한이 있다면, Apache를 이용하여 구현할 수 있습니다. 비밀번호 파일 만들기 비밀번호 파일은 htpasswd 명령어로 만듭니다. /home/auth/ 디렉토리에 passwords라는 이름의 파일을 만들고, 사용자 user1의 비밀번호를 정하고 싶다면 다음과 같이 명령합니다. # htpasswd -c /home/auth/passwords user1 .htaccess 파일 만들기 웹사이트의 루트 ...
Ubuntu 24.04 Server / 설치된 패키지 확인하는 방법
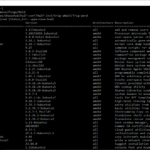
우분투에서 설치된 패키지 확인은 apt 또는 dpkg 명령어로 할 수 있다. 출력하는 내용에 차이가 있다. apt 명령어로 설치된 패키지 확인 설치된 모든 패키지를 출력한다. # apt list --installed 설치된 패키지 중 이름에 mariadb가 있는 것을 출력한다. # apt list --installed | grep mariadb dpkg 명령어로 설치된 패키지 확인 설치된 모든 패키지를 출력한다. # dpkg -l 설치된 패키지 중 이름에 ...